web
You’re offline. This is a read only version of the page.
close
Skip to main content

Notifications

Announcements

Community site session details

Community site session details

Session Id :
Power Platform Community / Forums / Power Automate / Automating saving files
Power Automate
Suggested Answer

Automating saving files

(1) ShareShare
ReportReport
Posted on by 28
Hi everyone,
So currently I have a small manual task that I was thinking of automating. The task is I have a Power BI Project file that's been stored at a location so I need to open it save that file as '.pbix' (By going to Save as -> File type: pbix) and save it in a specific folder. I will share few screenshots for more context:
So the thing is I have multiple Power BI Project files -> Right now I need to go in each Project file - Open the '.pbip' file -> Select the File option -> Save as -> Browse the destination folder -> Select Save as type: '.pbix' -> Save. This looks fine 1-2 reports but in case of multiple reports this can be tedious, so I was thinking whether this process can be automated using 'Power Automate Desktop' like by recording steps and using some of the pre-defined steps (run app) which can take much less time than manual work.
So as you can see there can be multiple folders: So here we need to go in each every Power BI Project Report folders and then open the '.pbip' file and save them as '.pbix' into the specific destination once done then come back go to the next folder and repeat the same set of actions (which can be done using loops). And for the loop iteration count (how many times it needs to execute) we can have some variable that stores the count (so like from above image its 2) -> Once we are done with the saving then we come back one level the count is reduced by 1 and the loop (for saving file : pbip to pbix) will continue until count: 0
Once the saving is done then close the Power BI Desktop (application) go back open the next report folder -> Repeat the same process (continue this until all reports are covered)

I have created a rough flow diagram (wherein I have tried to mention all the information in a concise fashion), you can check the attached image (aka attachments)

So I just needed some guidance on how to achieve this, haven't used Power Automate Desktop much than that of Power Automate (cloud flows), so is this feasible if so please let me know how to approach this. If any additional information is needed do let me know I am happy to share.

Regards,
Sidhant.
 
I have the same question (0)
  • Suggested answer
    stampcoin Profile Picture
    5,058 Super User 2025 Season 2 on at
    Maybe use powershell could be better. ( if the file doesn't have the data model )
    try this one first if it can be saved as pbix from pbip
     
  • Suggested answer
    Riyaz_riz11 Profile Picture
    3,878 Super User 2025 Season 2 on at
    Hi,

    Step 1: Setup Variables

    # Create these variables at the start of your flow:
    - SourceFolder: "C:\YourSourceFolder\PowerBIProjects"
    - DestinationFolder: "C:\YourDestinationFolder\PowerBIReports"
    - FileList: (will store list of .pbip files)
    - CurrentFile: (current file being processed)

    Step 2: Get List of PBIP Files

    Action: Get files in folder

    • Folder: %SourceFolder%

    • File filter: *.pbip

    • Include subfolders: Yes (if needed)

    • Store into: %FileList%

    •  

    Step 3: Loop Through Files

    Action: For each


    • Value to iterate: %FileList%

    • Store into: %CurrentFile%

    •  

    Step 4: Open Power BI Desktop

    Action: Run application


    • Application path: "C:\Program Files\Microsoft Power BI Desktop\bin\PBIDesktop.exe"

    • Command line arguments: "%CurrentFile.FullName%"

    • Wait for application to load: Yes

    • Timeout: 30 seconds

    •  

    Step 5: Wait for Power BI to Load

    Action: Wait for window


    • Window title: Contains "Power BI Desktop"

    • Timeout: 60 seconds

    •  

    Step 6: Navigate to Save As

    Action: Send keys


    • Window: Power BI Desktop window

    • Text to send: {Alt}+{F} (Opens File menu)

    •  

    Action: Wait


    • Duration: 1 second

    •  

    Action: Send keys


    • Text to send: {A} (Save As option)

    •  

    Step 7: Handle Save As Dialog

    Action: Wait for window


    • Window title: Contains "Save As"

    • Timeout: 10 seconds

    •  

    Action: Set text field


    • Text field: File name field

    • Text: %CurrentFile.NameWithoutExtension%

    •  

    Action: UI element > Click


    • UI element: "Save as type" dropdown

    • Wait for element: 3 seconds

    •  

    Action: Send keys


    • Text to send: {P} (selects .pbix format)

    •  

    Action: Set text field


    • Text field: Folder path

    • Text: %DestinationFolder%

    •  

    Action: UI element > Click


    • UI element: "Save" button

    •  

    Step 8: Handle Potential Overwrite Dialog

    Action: If window exists


    • Window title: Contains "already exists"

    • Then: Click "Yes" or "Replace"

    •  

    Step 9: Close Power BI Desktop

    Action: Send keys


    • Window: Power BI Desktop

    • Text to send: {Alt}+{F4}

    •  

    Action: Wait


    • Duration: 2 seconds

    •  

    Action: If window exists (Handle unsaved changes dialog)


    • Window title: Contains "Save changes"

    • Then: Click "No" or send {N}

    •  

    Step 10: End Loop

    Continue to next file in the loop

    Method 2: Using PowerShell Script (Alternative)

    PowerShell Script Integration

    Action: Run PowerShell script

    powershell
    # PowerShell script to batch convert PBIP to PBIX
    $sourceFolder = "C:\YourSourceFolder"
    $destFolder = "C:\YourDestinationFolder"
    $powerBIPath = "C:\Program Files\Microsoft Power BI Desktop\bin\PBIDesktop.exe"
    
    Get-ChildItem -Path $sourceFolder -Filter "*.pbip" | ForEach-Object {
        $inputFile = $_.FullName
        $outputFile = Join-Path $destFolder ($_.BaseName + ".pbix")
        
        # Start Power BI Desktop with the file
        Start-Process -FilePath $powerBIPath -ArgumentList "`"$inputFile`"" -Wait
        
        # Note: This method requires additional UI automation
        # or Power BI command line tools if available
    }

    Method 3: Recorder-Based Approach (Simplest)

    Recording Steps:


    1. Start Recording in Power Automate Desktop

    2. Manually perform the conversion for ONE file:

      • Open Power BI Desktop

      • Open .pbip file

      • File → Save As

      • Change file type to .pbix

      • Navigate to destination folder

      • Save file

      • Close Power BI Desktop


      •  
    3. Stop Recording

    4. Edit the recorded flow to:

      • Add file loop at the beginning

      • Replace hardcoded file paths with variables

      • Add error handling
     
    If I have answered your question, please mark it as the preferred solution ✅ . If you like my response, please give it a Thumbs Up 👍.
    Regards,
    Riyaz
  • Sidhant_22 Profile Picture
    28 on at
    Hi @ & @,
    Thanks for your response appreciate it, so before checking the post (comments/response) even I had thought two approaches either to record for one single file (the recording session seems to be buggy in between not that smooth), so I thought of trying out for one file (Power BI Project) and if that works I thought I would extend it, so I had queried regarding this in ChatGPT and the steps that @Riyaz_riz11 shared they were quite similar, but there were issues in one of them being: To open the save as window it has suggested 'ALT +F' and then 'a', but alt (lists out the options and 'F' selects the File but when we click on 'A' key it does nothing)


    And on clicking F: File option is selected:

    And then once you press 'A/a' key nothing happens (so the next set of steps don't come in picture at all). Instead while experimenting I found out after Alt + F we need to press Enter it opens the File option and then navigate down (3 down arrow keys) and then we need to select the Browse this device option
    So in the sed keys the text to send that I used was:
    {{Alt}}(F){{Enter}}{{Down}}{{Down}}{{Down}}

    This fails to parse: SO I made few changes like: removed working folder and in Command Line argument kept it: %FilesList[0]% (FilesList is the variable which has the file that is to be opened that is pbip), this opens the BI Desktop but then throws an error stating '%FilesList[0]'% could not be found


    Then I also tried the steps which Riyaz had shared: ( I was able to get till step 6: but since I had few doubts regarding the shortcut to open save as I first thought of executing)


    This just executed and didn't even open power bi desktop (and after step 6 I was not sure about the ations) like I did not find any action named 'Set text field', the only options that were available were:


    I even tried removing the blank variables but still there was no change.
    So anything that I missed, and how can we improve this?

    Regards,
    Sidhant.
  • Sidhant_22 Profile Picture
    28 on at
    Additionally I tried the manual approach wherein I recorded my steps using the recorder (to save one file: Power BI Project as Power BI file pbix) and saved the flow:


    The thing is when I tried to execute it somehow it starts failing like it throws an error like unable to find window (but while recording the steps were pretty clear).
    So any idea what might the issue here and how to make it robust dynamic?

    Regards,
    Sidhant.

     
  • Sidhant_22 Profile Picture
    28 on at
    Hi @ & @,
    A quick update I was able to solve 50% portion of the flow which is opening the specific 'pbip' (Power BI Project file) in Power BI Desktop, for that I had to make few changes in my existing flow like:
    -> I added a loop (for-each) to get the file details from the list (i.e. Get files in folder action : It returned a variable: 'FilesList')
    -> Then using this variable details I created another variable which will store the complete file path of the pbip file (variable name: FilePathVar)
    -> Instead of running the Power BI Desktop.exe I used the command prompt to open the pbip file (since pbip file is not a direct executable file like .pbix)
    -> Added a wait action for 20 seconds and then used 'Click UI element in window' action to click on Files
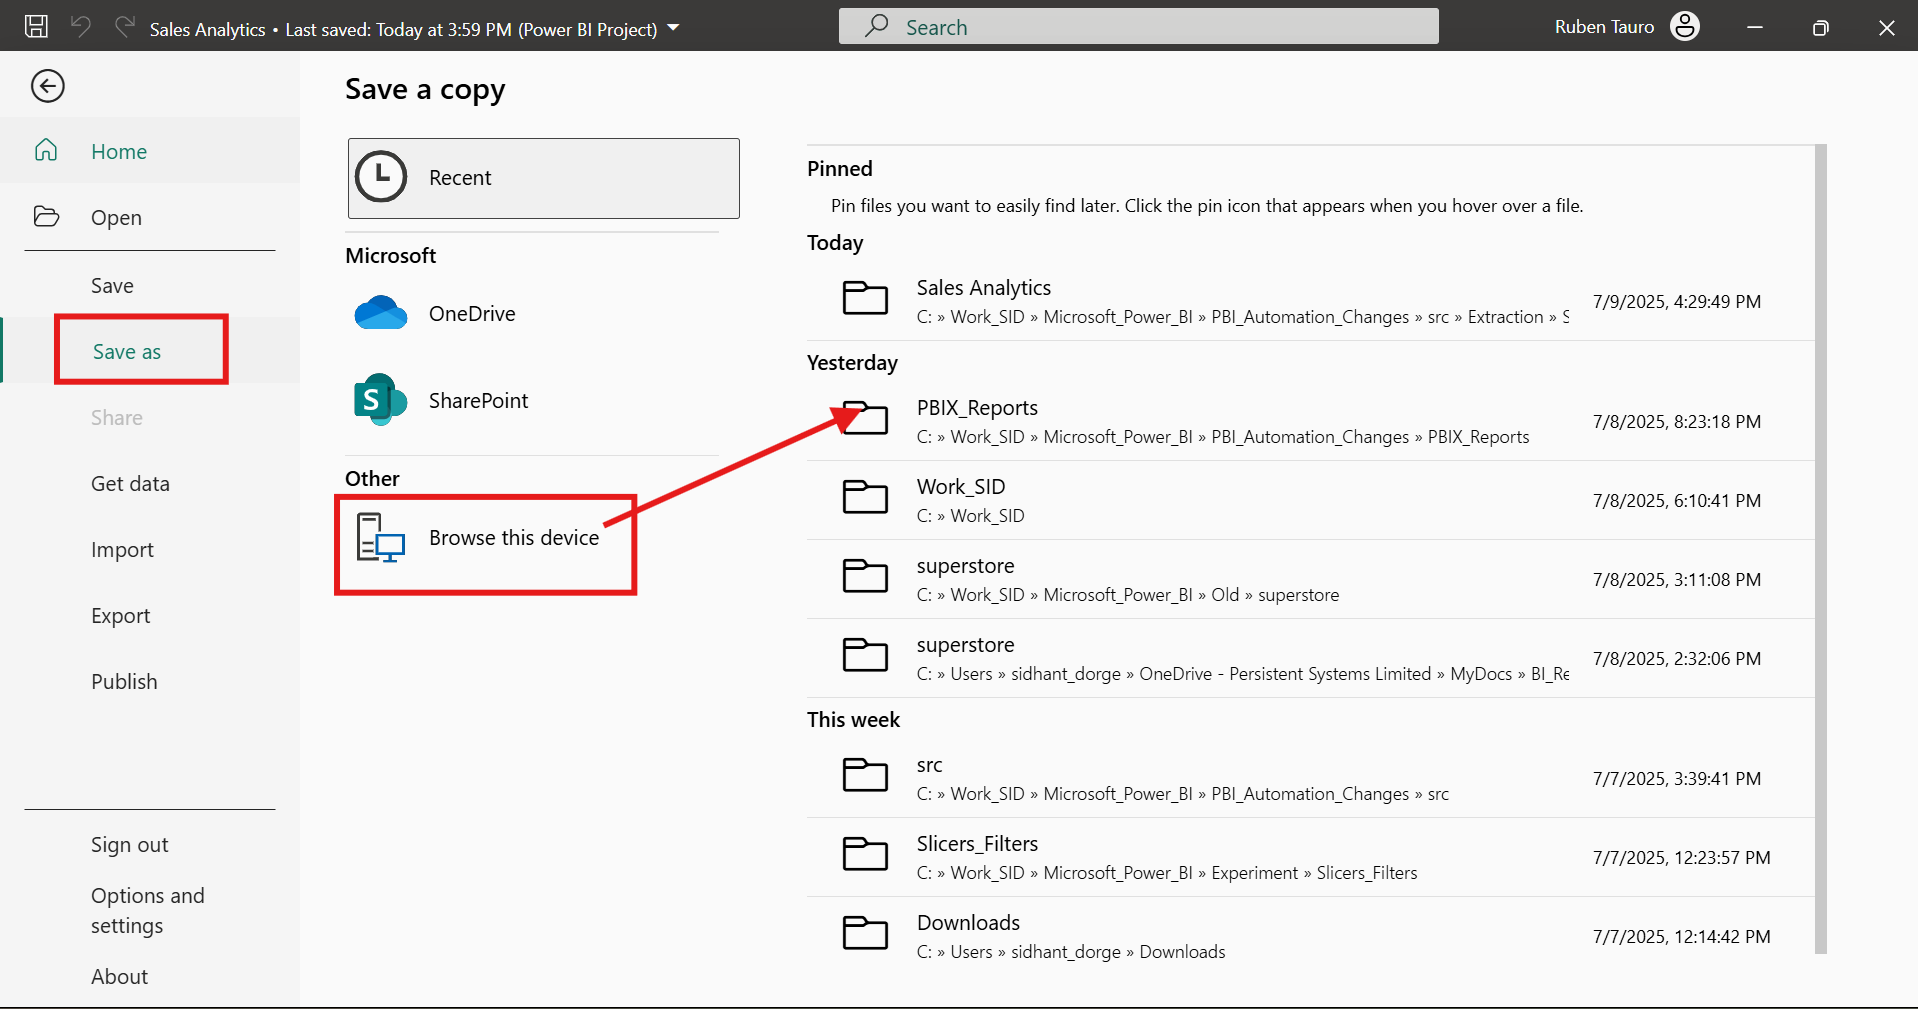
    After this I did try to another action: 'Click UI element in window' to click on Save as option (and then followed by Browse by device) but somehow I am not able to capture the specific button (it is suggesting the entire window which I don't want)


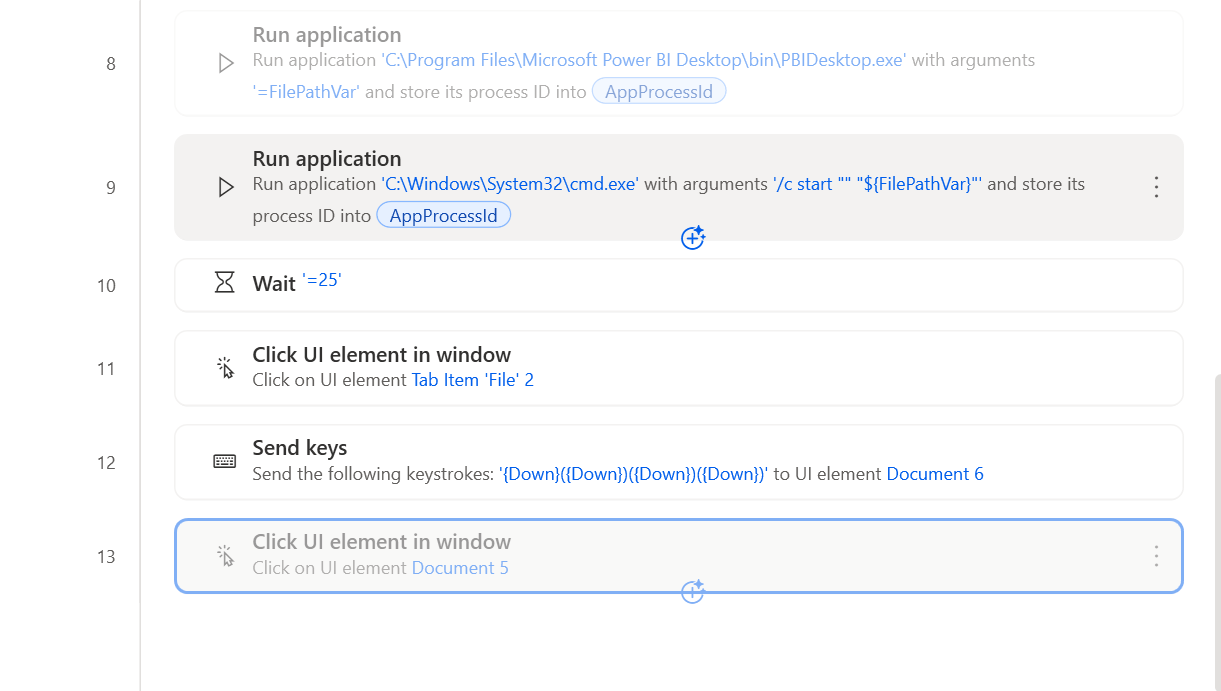
    So to navigate to Save as option I even tried to make use of 'Send keys' action by using Down arrow key 4 times (Down + Down + Down + Down -> {Down}({Down})) but even that didn't work out.

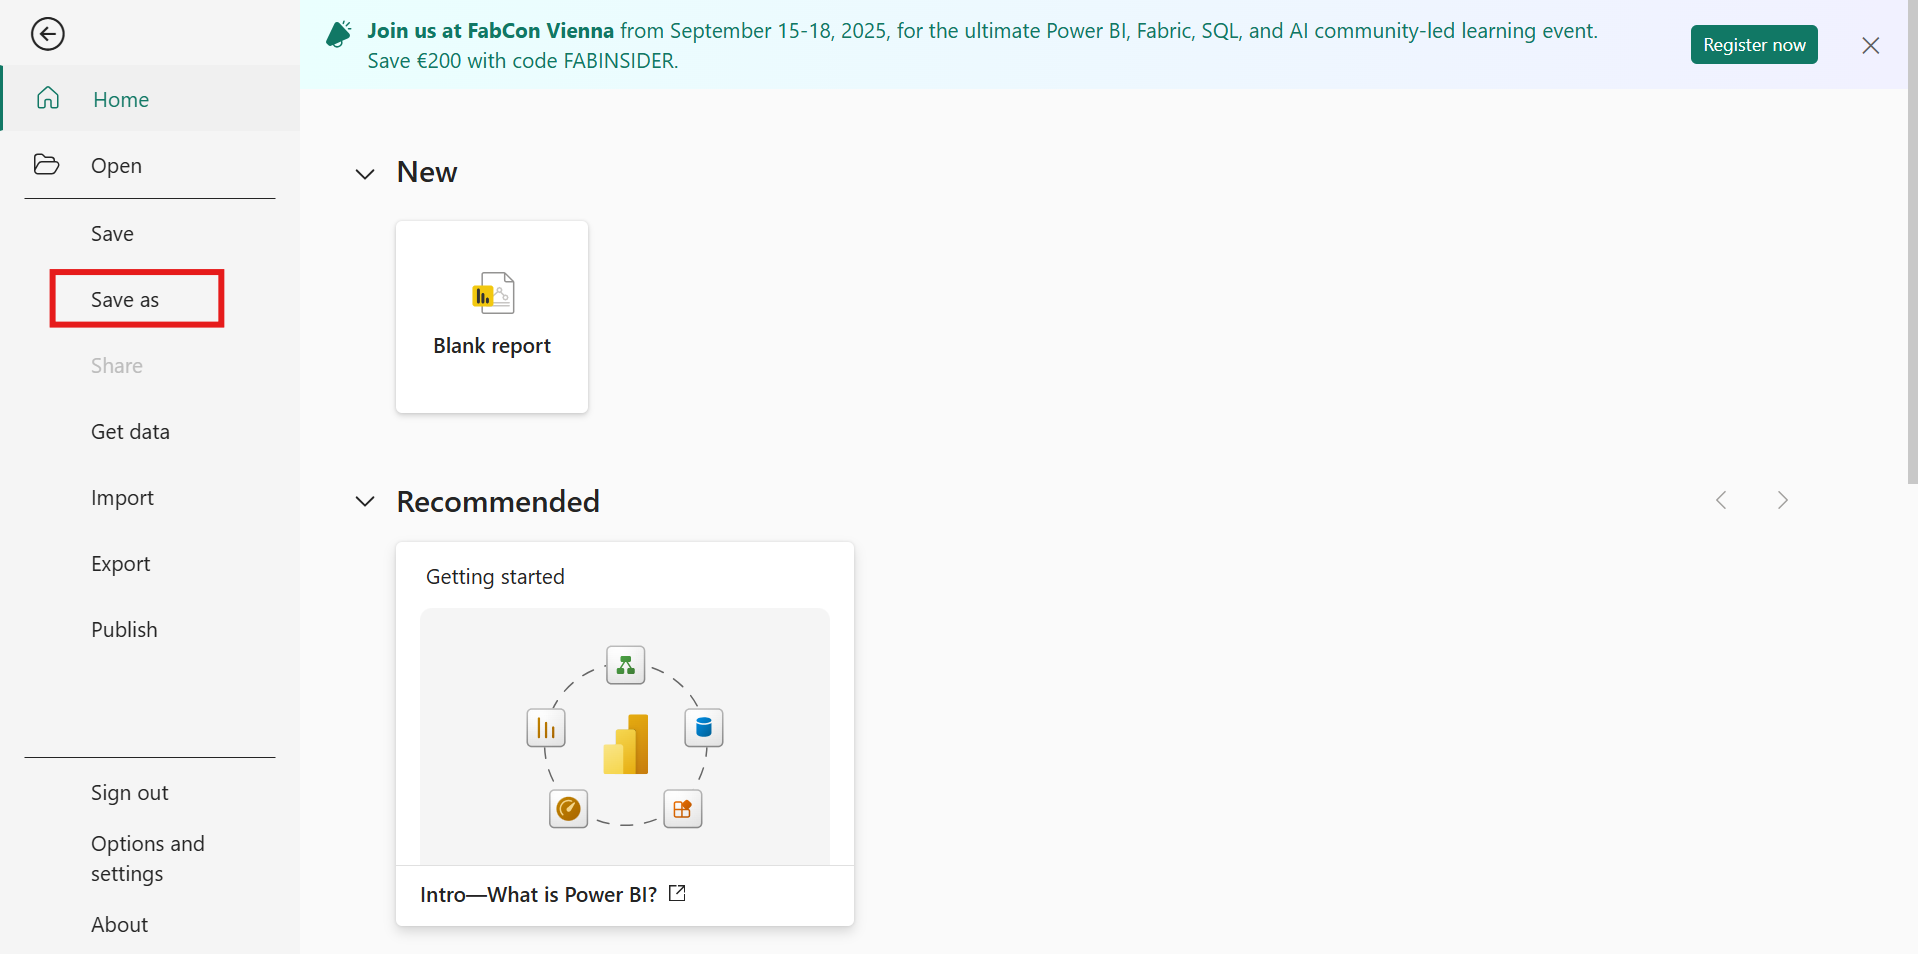
    So currently I am able to open the File menu but there are couple steps which are still left that are navigate to: Save as: Save type: To be selected as Power Bi File (from the dropdown) (*.pbix) and save i.e.:


    So any idea how to proceed from here?.

    Also @ you had suggested the CLI method is better and shared a link I went through that, as per my reading I guess it converts to pbit format but I need pbix. If you have the documentation or script that can help me do share that.

    Regards,
    Sidhant.
  • Sidhant_22 Profile Picture
    28 on at
    Hi,
    A quick update I was able to overcome the issue of selecting the 'Save as' option selection (after arriving/opening the File menu option), it took some time but eventually after few attempts I was to able to select the options using the 'Click UI element in window'. Sharing the updated flow (end steps)


    (To select the pbix option used one UI element to click on drop-down) -> Then used another UI element click to select pbix -> And finally another UI element click: To click on Save


    So now I have managed to save one file (from a respective source) to destination, now I just need to make this dynamic i.e.:
    So the source will be: C:\Work_SID\Microsoft_Power_BI\PBI_Automation_Changes\src\Extraction
    I need to check the no of folders : Then go inside each of them -> Then repeat the process : Like (In Sales Analytics: I open the folder -> Select the pbip file -> open it -> Save it as pbix -> Close BI Desktop -> Come back check the next folder Analysis repeat the same process), and stop when all are covered; for this earlier in my query post I did share that I was thinking of maintaining a 'variable' which holds the count (and once a pbip to pbix save is done and when we return back to source the count should be reduced by 1) and once count=0 stop.
    So for this next phase I needed some inputs on how to approach this.

    Regards,
    Sidhant.
  • Sidhant_22 Profile Picture
    28 on at
    Hi @Riyaz_riz11 and @stampcoin,
    Quick update I was able to find out a way on how to manage multiple files in a given folder (here Extraction) so I made few changes in the flow:
    Added a nested loop: Outer loop will traverse all the folders and the inner loop will get the sub-folder files details.

    So through this I am able to get the files within the sub-folders. Also one more change that I made once we open the File menu option instead of using 'Click UI window element' action I used the 'Send Keys' action to navigate to the Save as (and the other actions remained as it is). But there is one issue that I cam across for the 2nd report which was named superstore it was expected that it will work with no issues but somehow it failed at the 'Click UI element window' for 'File'; and I observed within the UI element the window which it was referring to was for the previous report i.e. 

    The UI element is correct but if you look closely in the UI element path you can see 'Sales Analytics' (this is the previous report which was been saved) and the next report name is different i.e. 'superstore', so is this the issue why I am getting the error : 'Could not find the UI element'.
    So to resolve this issue I thought of opting for the keyboard shortcut which @Riyaz_riz11 had shared in his 1st reply which was : Press Alt+F (This selects the File Menu option i.e. highlights it like)

    And to enter in the File menu all I need to do is Press Enter which opens the Menu

    So I added a 'Send Key action' and its value: Passed the Value as : {Alt}({F})({Enter})
    But when I ran the flow there was no issue but I did not get the expected result i.e. opening the File Menu.
    So I did search for the format as well and I came across one post which was quite similar and there as well the answered reply used the same format which I have used 
    Referenced Forum Post: Keyboard Shortcuts format

    So can you help me to debug what might the cause and if you have inputs please do share them.

    Regards,
    Sidhant.
  • Suggested answer
    Sidhant_22 Profile Picture
    28 on at

    Hi @Riyaz_riz11 & @stampcoin,
    I was able to overcome the issue (which I had shared earlier: To open the File Menu and the rest of the actions), so instead of using the 'Click UI element window' action I made use of 'Send keys' action. Reason being: 'Click UI element window' the window name which was being captured while capturing the UI element (let's say I using a Power BI Project file 'Sales Analytics' then the window name would use that as a reference and if some other report is opened that same action used to fail: 'Could not find the UI element'). So in order to resolve that I did experiment with 'Send Keys' action, and after some attempts I did get the expected result.
    So, to open the 'File Menu'-> Command: Alt + F + Enter -> I used 2 'Send Keys action': with value: {Alt:1}({F}) {Enter}, it looks like:

    Similarly for other actions to navigate to 'Save As' option -> Used: 'Send Keys' action with Value: {Down:4} and to Browse to the Destination and select the file type:


    Regards,
    Sidhant.
  • stampcoin Profile Picture
    5,058 Super User 2025 Season 2 on at
    Great job 👍, please mark it as answered.

Under review

Thank you for your reply! To ensure a great experience for everyone, your content is awaiting approval by our Community Managers. Please check back later.

Helpful resources

Quick Links

Forum hierarchy changes are complete!

In our never-ending quest to improve we are simplifying the forum hierarchy…

Ajay Kumar Gannamaneni – Community Spotlight

We are honored to recognize Ajay Kumar Gannamaneni as our Community Spotlight for December…

Leaderboard > Power Automate

#1
Michael E. Gernaey Profile Picture

Michael E. Gernaey 501 Super User 2025 Season 2

#2
Tomac Profile Picture

Tomac 323 Moderator

#3
abm abm Profile Picture

abm abm 237 Most Valuable Professional

Last 30 days Overall leaderboard