Preview of the sample operations enabled by this
Dataset For Examples
For our examples we will use a dataset of 2000 customer food orders.
First we can quickly show this set-up can replicate basic functionality of a Select action, then we can get into examples of more interesting things.
Select & Rename Columns
The Azure Function takes an array or JSON array input for the transform_from parameter & a transformation string for the code that will execute for every item / record of the transform_from array. The output of each transformation string must be a value, an array, or a JSON object that can be appended to the output array.
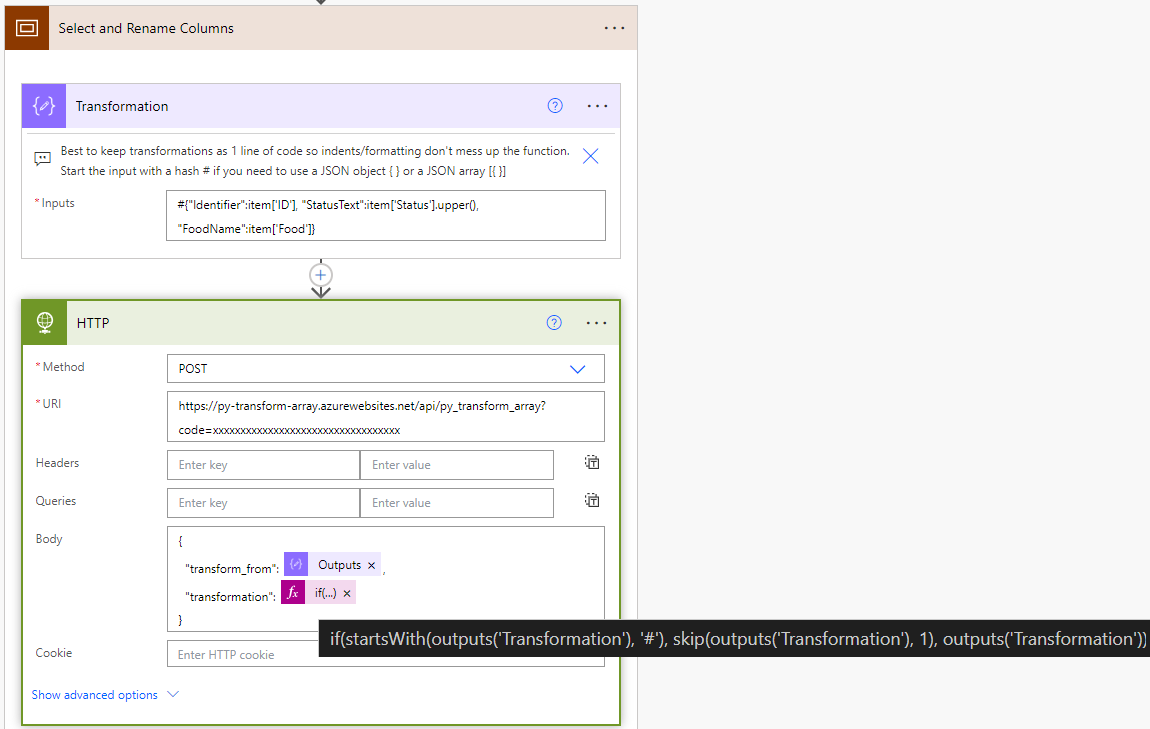
So we can use our SampleData for the transform_from parameter & we can use a transformation string of...
where we can reference columns in the transform_from JSON array with item['InsertColumnName'] and we can use Python expressions & functions to modify the data like .upper(). We want to output a JSON object for each of the records in transform_from so we format everything as JSON with our item references as the values. Although Compose actions will throw an error if we have something similar to, but not quite actual JSON in our Inputs, so we avoid that error by adding a hash # at the start of the string & then handling/removing it in the follow-on expression in the HTTP Body input for transformation.
Also note that to avoid errors due to indentation / formatting in the Python code it is best to build all transformations to be one-line of code without linebreaks, tabs, etc.
When we run this we get the following where the columns have been renamed & the statuses are in all uppercase.

Multiply Array
For our other basic example we can see the action can intake a regular array too, using "item" to reference each array item.
If we run this we get each array item multiplied by 2.
Apply Regex to Column & Output to New Delimited Column
First up for our more advanced examples we have a one-line code snippet in our transformation that applies regex to a column of each object & outputs all the regex matches to a delimited list in another output column.
Specifically for each transform_from JSON object, it applies a regex pattern to find each individual word in the Food column, outputs a bar | delimited list of all the words to a RegexOutput column, and merges that new RegexOutput column with the original transform_from object.
So when we run it we get the following.
Split Column to New Columns
Next is my favorite example, not because of the specific functionality, but because it shows something very significant that could never be done in a standard Select action. It includes loops inside the expression! Since this is Python, we can write one-line expressions with map and/or loop statements!
So this specific transformation references the Food column of the current transform_from JSON object, splits the value on spaces, & then for each split value creates a new column that it merges with the rest of the original transform_from JSON object.
So when we run this we get the following.
Import & Set-Up
Find & download the Solution import package at the bottom of this main post. Go to the Power Apps home page (https://make.powerapps.com/). Select Solutions on the left-side menu, select Import solution, Browse your files & select the PYTransformArray_1_0_0_2.zip file you just downloaded. Then select Next & follow the menu prompts to apply or create the required connections for the solution flows. And finish importing the solution.
Once the solution is done importing, select the solution name in the list at the center of the screen. Once inside the solution click on the 3 vertical dots next to the flow name & select edit.

The flow should be open, so next we are going to set up the Azure Function for the HTTP actions in the flow.
We want to select to Create a new function app & go through the creation menus.
Make sure to choose Python for the Runtime stack.
Once you get to the Function App resource select Create function under Create in Azure portal, select HTTP trigger, & select Next. Then select Create.
Once in the Function code view you can go back to the flow tab, copy everything in the Azure Function Python Script action, select all the sample code in the editor, & paste the actual function code over the sample code in the editor. Then select to Save the function.
After saving the function you can select Get function URL & copy the Function key url. This url needs to be pasted into the URI of each HTTP action back in the flow.
So paste it in the URI for each HTTP action.
Now you're ready to test with the sample data or to build these into a workflow with some of your own data.


