
Want to validate XML messages? Don't want to use a $3600+ per year Azure Integration Account? Here's a way to validate XML messages against a schema for almost no cost, using a Python Azure Function & optionally some blob storage.
I had a project requirement to directly validate XML messages users were sending to one of my APIs and to return information on any XML message errors found. My stakeholders did not want to convert to another format like JSON for the validations.
I did not like that a relatively simple function usually required an Azure Integration Account. So I found a Python library that can do XML validations & created an Azure Function for it.
One additional challenge was the XML schema for my validations included several imports with multi-layered dependencies. So I also decided to create a public blob storage to host all the schema import files & I swapped out the import file references for URLs of my public blob storage files. That way my schema could be used for validations without file directory references.
Examples
Schema validation failure due to a string in quantity integer field
Error message:
failed validating '1 TEST STRING IN INT ERROR' with XsdAtomicBuiltin(name='xs:positiveInteger'):
Reason: invalid literal for int() with base 10: '1 TEST STRING IN INT ERROR'
Schema component:
<xs:simpleType xmlns:xs="http://www.w3.org/2001/XMLSchema" name="positiveInteger" id="positiveInteger">
<xs:annotation>
<xs:documentation source="http://www.w3.org/TR/xmlschema-2/#positiveInteger" />
</xs:annotation>
<xs:restriction base="xs:nonNegativeInteger">
<xs:minInclusive value="1" id="positiveInteger.minInclusive" />
</xs:restriction>
</xs:simpleType>
Instance type: <class 'xml.etree.ElementTree.Element'>
Instance:
<quantity>1 TEST STRING IN INT ERROR</quantity>
Path: /shiporder/item[1]/quantity
Schema validation failure due to missing title field
Error message:
failed validating <Element 'item' at 0x7f2d2657d950> with XsdGroup(model='sequence', occurs=[1, 1]):
Reason: Unexpected child with tag 'note' at position 1. Tag 'title' expected.
Schema component:
<xs:complexType xmlns:xs="http://www.w3.org/2001/XMLSchema">
<xs:sequence>
<xs:element name="title" type="xs:string" />
<xs:element name="note" type="xs:string" minOccurs="0" />
<xs:element name="quantity" type="xs:positiveInteger" />
<xs:element name="price" type="xs:decimal" />
</xs:sequence>
</xs:complexType>
Instance type: <class 'xml.etree.ElementTree.Element'>
Instance:
<item><note>Special Edition</note><quantity>1</quantity><price>10.90</price></item>
Path: /shiporder/item[1]
Schema validation success
Import & Set-Up
Find & download the Solution import package at the bottom of this main post. Go to the Power Apps home page (https://make.powerapps.com/). Select Solutions on the left-side menu, select Import solution, Browse your files & select the ValidateXML_1_0_0_xx.zip file you just downloaded. Then select Next & follow the menu prompts to apply or create the required connections for the solution flows. And finish importing the solution.
Once the solution is done importing, select the solution name in the list at the center of the screen. Once inside the solution click on the 3 vertical dots next to the flow name & select edit.
Now that the flow is imported & open, we need to set up the Azure Function used for the XML Schema Validation.
If you have already worked with and deployed Azure Functions before, then you can skip the extra installations.
If you haven't deployed Azure Functions, you can go to the Microsoft Store & make sure you have VS Code & Python installed.
Once VS Code is installed, open it. Go to the 4 blocks on the left side menu to open the list of extensions. Search for Azure in the extensions & select to install Azure Functions. Azure Account & Azure Resources will automatically be installed too.
Once all the extensions are installed, go to the Azure A on the left side menu & select to sign in to Azure.
Next set up a project folder on your machine for Azure Functions & a sub-folder for this XML Validation project.
Back in VS Code select the button to create a new Azure Function. Follow the Function set-up instructions selecting the XML Validations project folder you just created, Python language Model V2, and where in VS Code to open the new Azure Function project.
Once all the project files are loaded in VS Code, select the function_app.py file. Remove all the code in the file. Go back to the tab with the flow, open the "Azure Function Python Script" action, copy its contents & paste them into the function_app.py file in VS Code. Cntrl+S / Save the file.
Next go to the requirements.txt file. Go to the flow to the "Azure Function Requirements.txt" action & copy its contents. Paste the contents into the requirements.txt file in VS Code. Cntrl+S / Save the file.
Go back to the Azure A on the left-side menu. Select the Deploy function button. Select Create New in the list of function. Follow the menus/prompts to create a new function. (If Create New doesn't appear, you may have to log in to Azure, navigate to Azure Functions & go through the process to create a new function so the new function will appear in the list of function options to deploy to.)
Go to Azure & login. Go to Function App. Find & select the newly deployed function. Select the 1st function under Name. Select Get function URL & in the pop-up menu & copy the Function key url.
Paste the function URL into the URI input of the HTTP XML Validation action.
The flow is now set for you to test with the placeholder XML message & XML schema and/or for you to test your own content by replacing the XML message with one of your messages & replacing the Schema with your XML schema.
Optional Blob Schema Imports Example & HTTP Error Information Responses
The following is an example of setting up a public blob storage to host a multi-file xml schema and an example of setting up the Validate XMLs HTTP Trigger in the solution package to receive HTTP calls & return XML & XML schema error information.
Select to create a new storage account & go through the menus of options, making sure to set the Access tier to Hot & the Networking to Enable public access from all networks. After the Netowrk menu you can skip to Review + create and create your resource.
When you get the option, select to Go to resource. Then in the resource page go to Settings > Configuration, select to Allow Blob anonymous access, & Save
After configuring anonymous access, go to the Storage browser page, go to Blob containers, select Add container, then provide a container name, set the Anonymous access level to Blob [anonymous read access only], & select Create.
After creating the container, select to enter the container, then select to Upload files & upload all the schema files including all the files the schema files are dependent on.
All the uploaded files will have their own public blob urls. we can now use these public file urls for the import references across all the schema files. So start by opening the main schema file, find all the import references the main schema file is dependent on, select each of those blob files & copy their blob urls so you can paste them into the schemaLocation references.
Save the schema file with the new import references and re-upload it to the blob storage container to over-write the previous version of the file.
Then open each other schema file with dependencies to other files, redo their references to point to the blob file urls, & upload/over-write them.
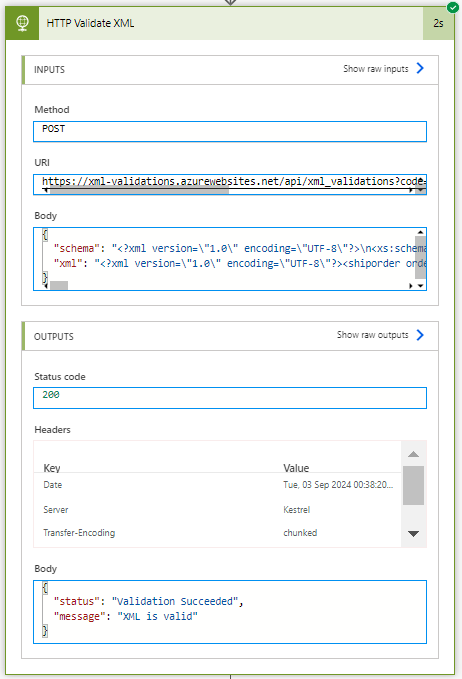
Once all the schema files & dependency references are set up, then we can move on to the workflow that receives HTTP POST requests with XML messages & outputs either a success message or an error message with error information.
You can start with the Validate XML HTTP Trigger flow from the Solution import.
Once inside the flow, you can copy the main schema file with the updated blob storage url references & paste it into the Schema Compose action in the flow.
You may notice the HTTP flow has multiple response actions for different scenarios. One for success, one for if the xml( ) expression fails in the HTTP action because of invalid xml, one for if the xml message does not match the correct schema, & one for unknown errors.
And when we run some tests, if we send invalid xml with random unstructured text, it returns an error indicating the xml is invalid.
If we send a message where one of the quantity inputs has text in it instead of the expected decimal value, then it returns an error indicating what does not follow the xml schema.
And if we send a message with valid xml and inputs that all follow the expected schema, then we get a success message.
*I have shown how this works with a Power Automate flow as that is the easiest to share / import. But for my actual use-case I built the xml validation into a Logic App flow on a consumption plan that can more readily handle the larger volume of calls the workflow may receive. Also to make things better, more secure, & more simple for partners who may send the xml data, I integrated the Logic App workflow into an Azure API Management instance. This allows me to share simplified API urls with partners & allows me to share different keys with different partners so I can better isolate & enable/disable their activity with the API workflow. (
https://youtu.be/HgUBClkNp34?si=3WUuvvDJ9Vodglt2)


