web
You’re offline. This is a read only version of the page.
close
Skip to main content

Notifications

Announcements

Community site session details

Community site session details

Session Id :

Trigger Power Automate Flows from D365 Entity Views/Grids: A Step-by-Step Guide

Dominik Stalzer | primeone Profile Picture Dominik Stalzer | p... 71

Original Post: Trigger Power Automate Flows from D365 Entity Views/Grids: A Step-by-Step Guide

This guide explains how to trigger or run a D365 Power Automate Flow from an entity's view grid using a custom button and a small JavaScript script.


To start, create a new Automated Cloud Flow in Power Automate.


Set the trigger to "When a HTTP request is received" and choose "Anyone" under the "Who can trigger the flow" option. After saving the flow for the first time, the "HTTP POST URL" will be generated automatically.


JSON Schema for the Request Body:
{
    "type": "object",
    "properties": {
        "id": {
            "type": "string"
        }
    }
}

Add a new step called "Get a row by ID." Select the Contacts table and use the following code in the "Row ID" field:
replace(replace(triggerBody()?['id'], '{', ''), '}', '')


Save the flow and copy the generated HTTP POST URL. Afterward, return to your solution and open the appropriate Model-Driven App, such as Customer Insights - Journeys.


In the navigation pane, select the entity's view and click on "Edit command bar."


Choose the "Main grid" option.


Add a new command button and name it, for example, "RunFlow."


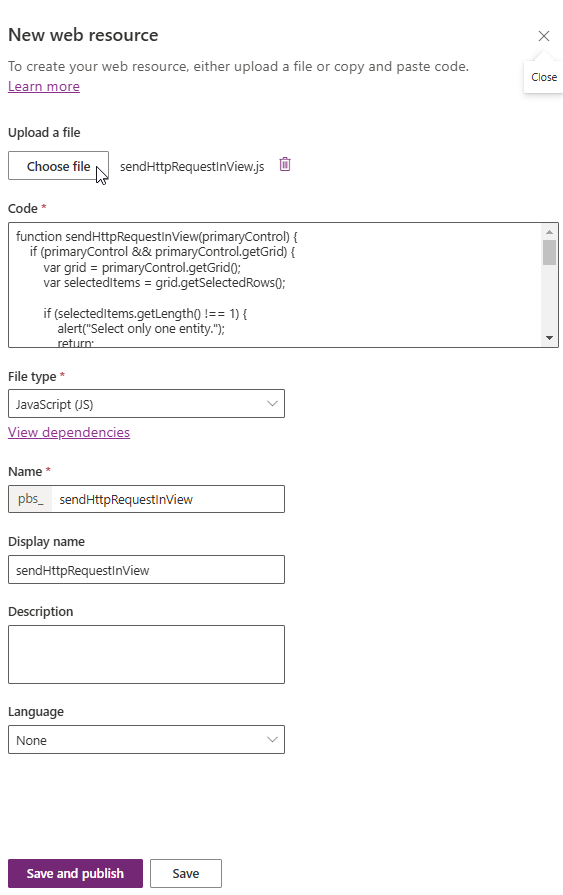
In the Properties pane, set the action to "Run Javascript." Click on "Add Library," followed by "New web resource."


Create a local JavaScript file named sendHttpRequestInView.js with the following code:
function sendHttpRequestInView(primaryControl) {
    if (primaryControl && primaryControl.getGrid) {
        var grid = primaryControl.getGrid();
        var selectedItems = grid.getSelectedRows();

        if (selectedItems.getLength() !== 1) {
            alert("Select only one entity.");
            return;
        }

        var entityId = selectedItems.getAll()[0].getData().entity.getId();

        var flowUrl = "PASTE YOUR HTTP POST URL HERE";
        var data = { "id": entityId };

        var req = new XMLHttpRequest();
        req.open("POST", flowUrl, true);
        req.setRequestHeader("Content-Type", "application/json");
        req.send(JSON.stringify(data));
    } else {
        alert("Please trigger this script in a view.");
    }
}
Replace the placeholder in the flowUrl variable with the HTTP POST URL you copied earlier and save the file.

Upload the JavaScript file as a new web resource by clicking "Choose file" and selecting your saved script.


Save and publish the web resource, then return to the "Add Javascript Library" dialog. Search for the uploaded web resource by its name, such as sendHttpRequestInView, and select it.


In the Properties pane, add sendHttpRequestInView as the function name and set "PrimaryControl" as Parameter 1.


Adjust the visibility settings by selecting "Show on condition from formula" in the visibility dropdown. Open the formula bar and enter the following code:
If(CountRows(Self.Selected.AllItems) = 1, true, false)
This ensures that the button is only visible when exactly one entity is selected in the view.


Finally, test the functionality to confirm everything is working correctly.


I hope these instructions have helped some of you.

Comments